AirDrop is one of those features that just works, until it does not. Whether you accidentally tapped the wrong contact, sent a file to a stranger nearby, or just changed your mind halfway through a transfer, knowing how to cancel AirDrop quickly can save you from some seriously awkward moments.
This guide covers everything you need to know, from canceling a transfer mid-send to completely turning off AirDrop on your iPhone, iPad, and Mac.
What Is AirDrop and Why Would You Want to Cancel It?
AirDrop is Apple’s wireless file-sharing feature that uses a combination of Bluetooth and Wi-Fi to send photos, documents, links, and other content between nearby Apple devices. It works across iPhone, iPad, and Mac without needing an internet connection, which makes it incredibly convenient inside the Apple ecosystem.
But here is the thing: convenience does not always mean foolproof. There are several situations where you would want to stop or disable AirDrop entirely. Maybe you are in a crowded place and random people are sending you weird files. Maybe you hit send on a photo before you realized it was going to your boss instead of your friend. Or maybe you just want to protect your privacy and stop your device from being discoverable by strangers.
Whatever the reason, this guide has got you covered.
How to Cancel an Active AirDrop Transfer on iPhone
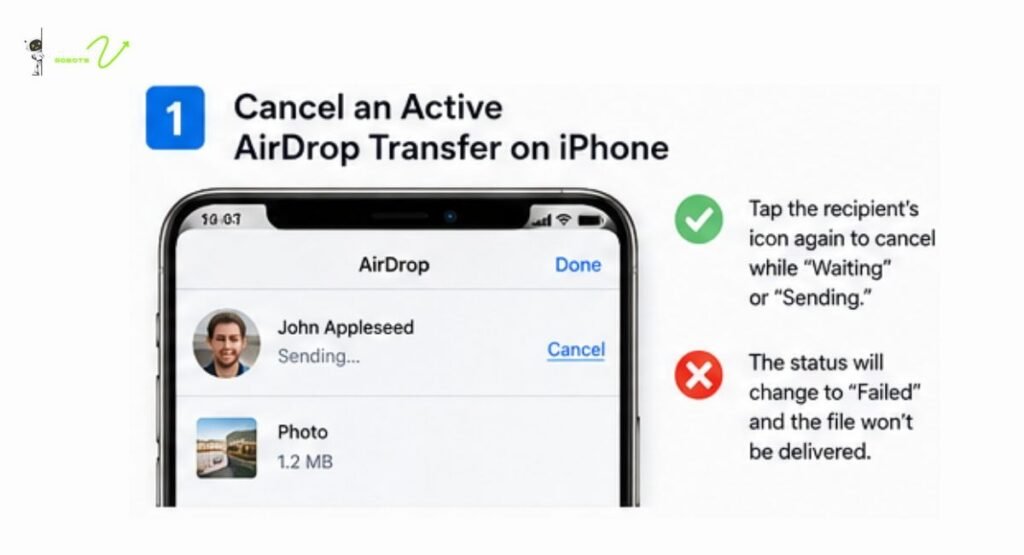
Canceling from the Sending Side
If you are the one sending the file and you want to stop it before it reaches the recipient, the process is pretty simple. Once you tap the AirDrop contact to send, your iPhone shows a “Waiting” or “Sending” status. At that point, you can tap the recipient’s profile picture or icon on your screen again, and this will cancel the transfer. The status should change to “Failed” or disappear entirely.
On some versions of iOS, you might also see a prompt with a cancel option right within the share sheet. Just tap it before the transfer completes, and you are done.
What Happens When You Cancel Mid-Transfer?
When you cancel an AirDrop transfer that is already in progress, the recipient does not receive the file. Even if a portion was already sent, AirDrop does not save partial files on the other device. The transfer simply stops, and nothing lands on the recipient’s device. So you can breathe easy, no half-downloaded photo sitting in their camera roll.
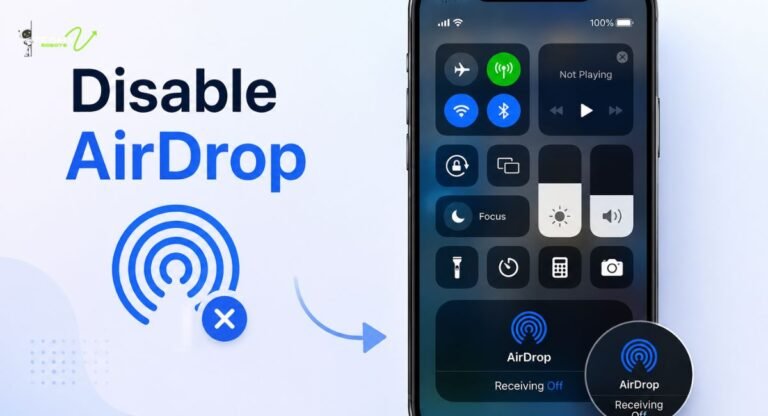
How to Turn Off AirDrop on iPhone Using Control Center
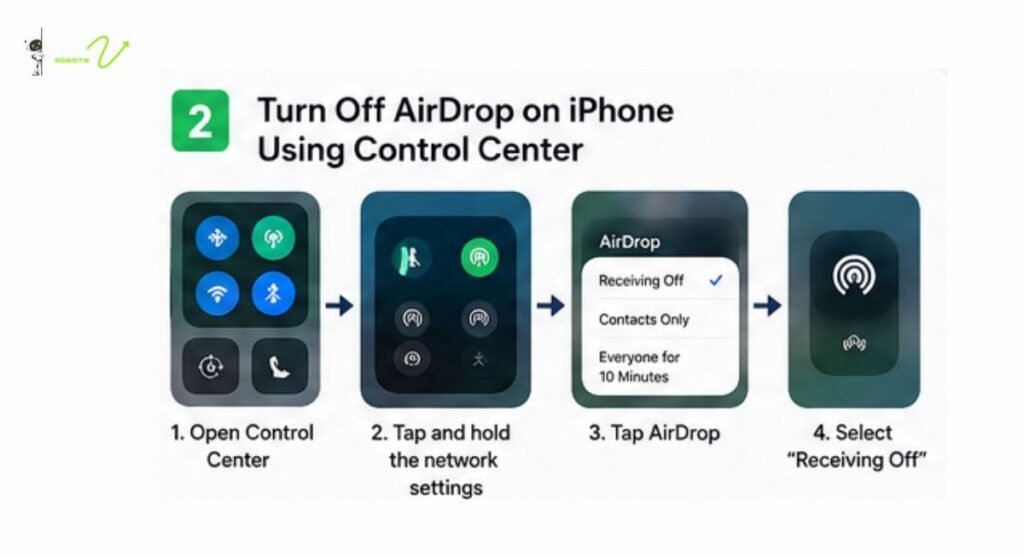
Step-by-Step: Disabling AirDrop from Control Center
The fastest way to disable AirDrop on an iPhone is through the Control Center. Here is how to do it:
- Swipe down from the top-right corner of your screen to open the Control Center (on older iPhones with a Home button, swipe up from the bottom).
- Press and hold on the network settings block, which is the box containing Wi-Fi, Bluetooth, Airplane Mode, and cellular icons.
- A larger panel will expand showing more options, including the AirDrop icon.
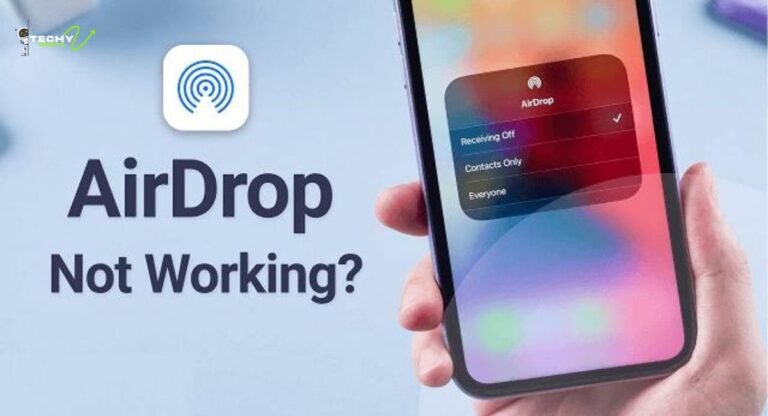
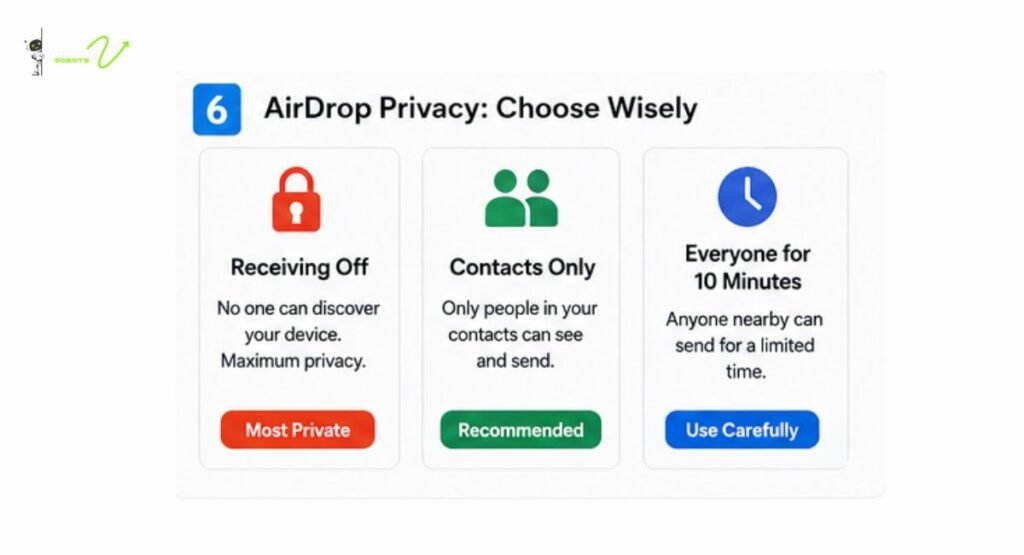
- Tap on AirDrop, and you will see three options: Receiving Off, Contacts Only, and Everyone.
- Select “Receiving Off” to stop your device from receiving any incoming AirDrop requests.
That is it. It takes about five seconds once you know where to look.
Setting AirDrop to “Receiving Off”
Choosing “Receiving Off” is the most private setting. It means your device will not show up in anyone else’s AirDrop list, and no one can send you files unless you actively change this setting back. It does not stop you from sending files to others, just from receiving them.
This is ideal when you are in public spaces like airports, coffee shops, or shopping malls where AirDrop spam from strangers is more likely to happen.
How to Disable AirDrop on iPhone Through the Settings App
Navigating to AirDrop Settings on iOS
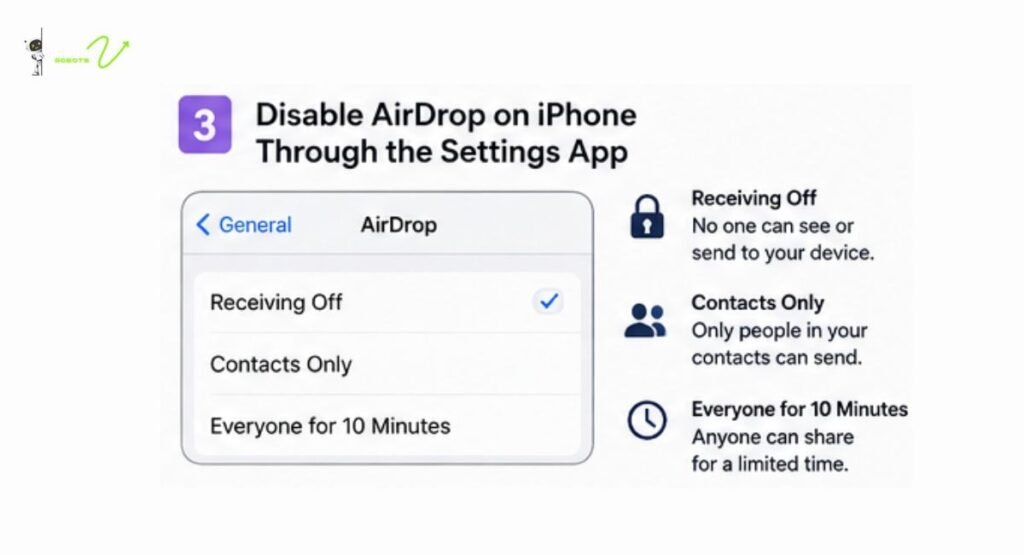
If you prefer going through the Settings app, the path is just as simple. Open Settings, tap on General, and then tap AirDrop. This will bring up the same three visibility options you see in the Control Center.
Choosing the Right Visibility Option
Here is a quick breakdown of what each option does:
- Receiving Off means no one can discover your device or send you files through AirDrop.
- Contacts Only means only people in your contacts can see your device and send you files. This is a solid middle ground for most people.
- Everyone for 10 Minutes is a temporary mode that lets any nearby Apple device see yours for a limited window, after which it reverts automatically.
For most everyday users, “Contacts Only” is the sweet spot. It keeps your device accessible to people you actually know while blocking random AirDrop requests from strangers.
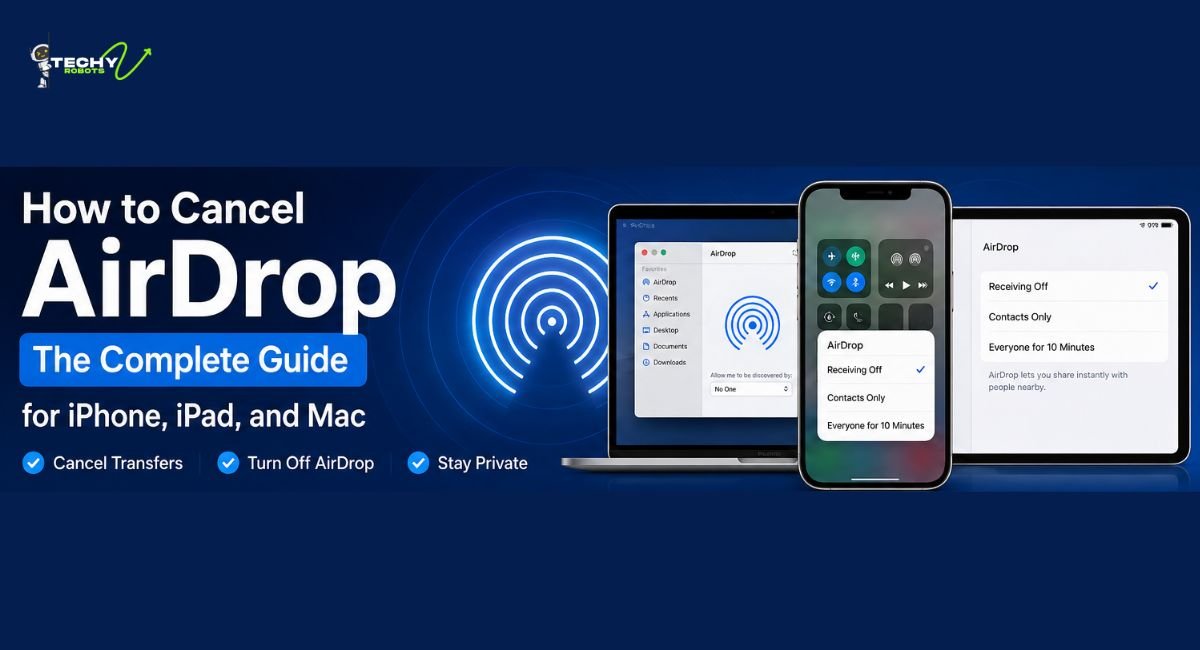
How to Cancel AirDrop on Mac
Stopping a Transfer in Progress on Mac
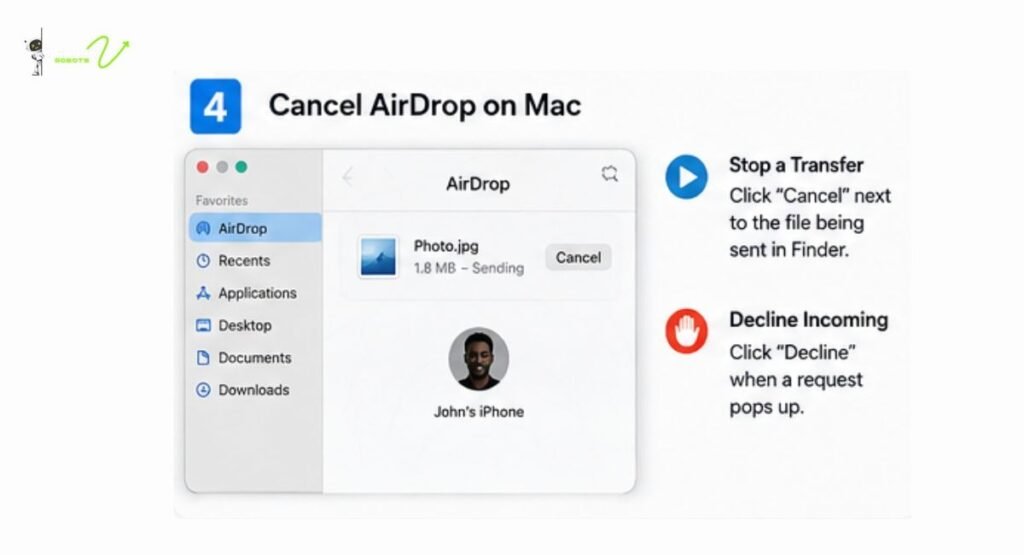
If you are sending a file from your Mac and want to cancel it while it is still transferring, open Finder and click on AirDrop in the left sidebar. You will see the transfer status there. Click “Stop” or “Cancel” next to the file being sent, and the transfer will be interrupted immediately.
If someone is sending you a file and you want to decline it, an AirDrop notification will pop up. Just click “Decline” and the file will not be saved to your Mac.
Turning Off AirDrop Discovery in Finder
To stop your Mac from being discoverable through AirDrop altogether, open a Finder window and click AirDrop in the sidebar. At the bottom of the AirDrop window, you will see a dropdown labeled “Allow me to be discovered by.” Change this to “No One” and your Mac will become invisible to all other AirDrop users nearby.
How to Turn Off AirDrop on macOS Ventura and Later
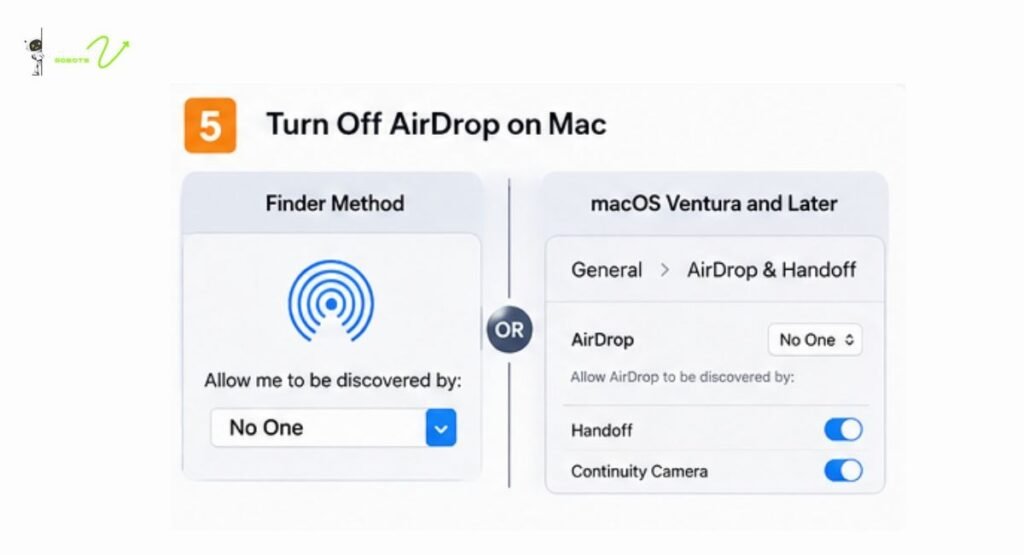
Using System Settings to Disable AirDrop and Handoff
Apple changed things up with macOS Ventura by replacing System Preferences with System Settings. If you are on Ventura or a newer macOS version, here is how to manage your AirDrop settings:
- Click the Apple menu in the top-left corner and open System Settings.
- Click on General in the left-hand sidebar.
- Select AirDrop and Handoff from the list.
- You will see the AirDrop setting at the top. Click the dropdown and change it to “No One” to turn it off completely, or adjust it to “Contacts Only” if you prefer limited discoverability.
This setting applies across your entire Mac, so any app trying to use AirDrop will follow these preferences.
How to Cancel AirDrop on iPad
Using Control Center on iPadOS
Canceling or disabling AirDrop on an iPad works almost identically to an iPhone. Swipe down from the top-right corner of the screen to open the Control Center. Press and hold on the connectivity block to expand it, then tap AirDrop and select your preferred visibility setting.
You can also go through Settings, then General, then AirDrop if you want to change it from there. iPad users running newer versions of iPadOS will find the same “Receiving Off,” “Contacts Only,” and “Everyone for 10 Minutes” options as on iPhone.
Understanding AirDrop Privacy Settings
Contacts Only vs. Everyone vs. Receiving Off
Think of these settings like a front door to your device. “Receiving Off” is like locking the door and pulling the blinds no one even knows you are home. “Contacts Only” is like leaving the door unlocked only for people who have your house key. “Everyone” (or Everyone for 10 Minutes) is basically leaving the door wide open to the whole neighborhood.
For privacy, the choice should almost always be either “Receiving Off” or “Contacts Only.” The “Everyone” option was more useful before Apple added the 10-minute limit, but even the temporary version should be used carefully in public settings.
The “Everyone for 10 Minutes” Option
Apple introduced this time-limited option in a later iOS update after concerns about AirDrop being misused in public spaces. When you select it, your device becomes visible to all nearby Apple devices for exactly 10 minutes, and then automatically switches back to “Contacts Only.” It is helpful when you need to quickly share something with someone who is not in your contacts, without permanently leaving your device open.
AirDrop Security Risks You Should Know About
Strangers Sending Unwanted Files
One of the biggest downsides of AirDrop being set to “Everyone” is that anyone nearby can attempt to send you files, including images you definitely did not ask for. This has been a well-documented issue, especially in crowded public places. It is sometimes called “AirDrop bombing,” where people send inappropriate or offensive content to strangers.
How to Protect Yourself from Suspicious AirDrop Requests
The fix is simple: keep your AirDrop set to “Contacts Only” or “Receiving Off” when you are out and about. If a transfer request pops up from an unknown source, always tap “Decline.” Never accept AirDrop files from people you do not know, even if the preview looks harmless. Encrypted or not, the file could still contain unwanted content.
How to Restrict AirDrop Using Screen Time
Setting Up Content and Privacy Restrictions
If you manage a device for a child or just want to lock down AirDrop settings so they cannot be changed, Screen Time is your friend. Here is how to set it up:
- Open Settings and tap Screen Time.
- Tap Content and Privacy Restrictions and enable it.
- Tap Allowed Apps or look for AirDrop under the relevant section.
- Toggle off AirDrop to prevent it from being used at all.
Once this restriction is in place, the AirDrop option in the Control Center will be grayed out and inaccessible. This is a great option for parents who want to make sure their kids are not accidentally sharing files with strangers.
What to Do If AirDrop Is Not Working After Canceling
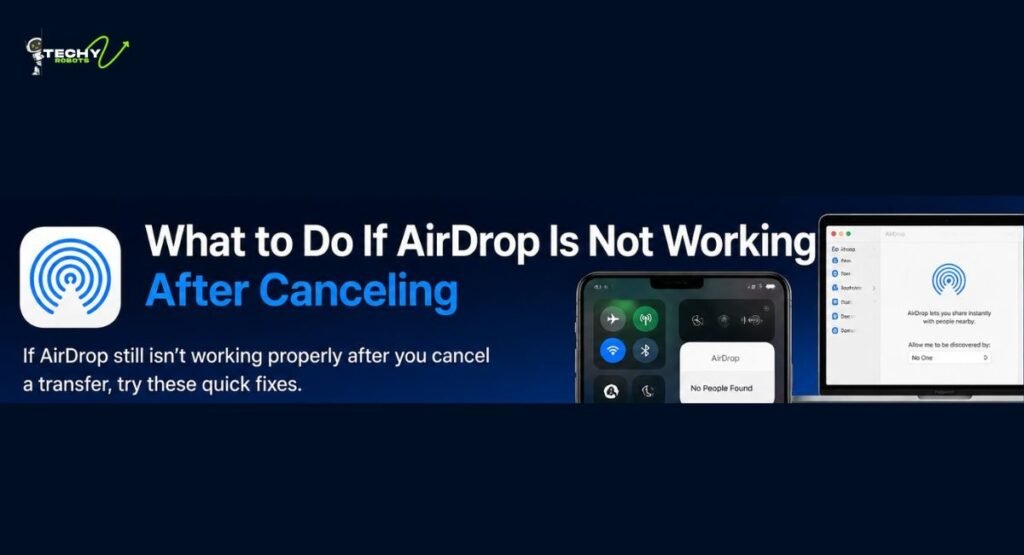
Common AirDrop Troubleshooting Fixes
Sometimes AirDrop can get a bit stuck after a canceled transfer. If you notice issues like AirDrop not showing nearby devices or transfers failing unexpectedly, here are a few things to try:
Turn Bluetooth and Wi-Fi off and back on again. AirDrop relies on both, so a quick toggle can clear up connectivity hiccups. You can do this from the Control Center.
Make sure both devices have AirDrop enabled and set to a visible option. If the recipient has it set to “Receiving Off,” your device simply will not see them.
Restart your iPhone or Mac. A reboot clears out background processes that might be interfering with AirDrop’s ability to function properly.
Check that Personal Hotspot is turned off. When Personal Hotspot is active on an iPhone, AirDrop gets disabled automatically. Turn off the hotspot and AirDrop should come back.
On Mac, make sure you are logged into the same Apple ID if trying to AirDrop between your own devices. If the handoff is not working between personal devices, account sync might be the issue.
AirDrop Alternatives Worth Considering
EaseUS MobiMover and Other File Transfer Tools
If AirDrop is giving you trouble or you need to transfer large files that AirDrop struggles with, there are solid alternatives out there. EaseUS MobiMover is a popular data transfer app that lets you move files between iPhone and Mac using a USB cable, bypassing wireless entirely. It supports photos, videos, contacts, and more, and it is a reliable option for transferring larger amounts of data.
Other alternatives include Google Drive, Dropbox, and iCloud Drive for cloud-based sharing. If you are transferring between Apple and non-Apple devices, these cloud tools are often the most practical route since AirDrop only works within the Apple ecosystem.
Tips to Avoid Accidental AirDrop Sends
Sending a file to the wrong person through AirDrop is more common than you might think. The contact icons in the share sheet can look similar, especially if people have similar profile photos or names. Here are a few habits that can help:
Always double-check the recipient’s name before tapping their icon in the AirDrop share sheet. The full name appears below the icon, so take a second to confirm before you send.
If you are sharing sensitive content like personal photos or work documents, consider turning on a habit of reviewing the share sheet carefully. It takes one extra second but saves a lot of potential embarrassment.
Keep AirDrop set to “Contacts Only” so only people you actually know show up in your share options. This dramatically reduces the chance of sending something to the wrong person since you would at least recognize the names on the list.
Conclusion
Canceling AirDrop or turning it off completely is one of those things that sounds technical but is actually really straightforward once you know where to look. Whether you are stopping a transfer in the middle of sending, switching your visibility to protect your privacy, or locking it down through Screen Time, Apple gives you plenty of control over how AirDrop behaves on your device.
The most important thing is being aware of your settings, especially in public places where “Everyone” mode can expose your device to people you do not know. A quick trip to the Control Center or Settings can make a big difference in how secure and private your device stays. AirDrop is a brilliant feature when used intentionally, and now you have all the tools to use it on your own terms.
FAQs
1. Can I cancel an AirDrop transfer after it has been accepted?
Once the recipient has accepted the transfer and the file has fully landed on their device, you cannot cancel it from your end. The only option at that point is to ask the recipient to delete the file manually.
2. Does turning off AirDrop affect Bluetooth or Wi-Fi?
No, turning off AirDrop only changes your discoverability and whether you can receive files. It does not disable Bluetooth or Wi-Fi, which continue working for other apps and connections.
3. Why does AirDrop not show up in the Control Center?
If AirDrop is restricted through Screen Time or Content and Privacy Restrictions, it will not appear as an option in the Control Center. Check your Screen Time settings to see if it has been blocked.
4. Is AirDrop transfer encrypted?
Yes, AirDrop uses encrypted connections for file transfers, which means the content being shared is protected during transit. However, this does not mean you should blindly accept files from unknown senders since the content itself could still be unwanted or harmful.
5. What is the difference between “Receiving Off” and “No One” on Mac?
These are essentially the same setting described differently across devices. “Receiving Off” is the term used on iPhone and iPad in the Settings app and Control Center, while “No One” is the label used in the AirDrop Finder window and System Settings on Mac. Both mean your device is completely hidden from other AirDrop users.