There is nothing more frustrating than trying to send a file from your iPhone to your Mac using AirDrop, only to sit there watching it spin endlessly with “Waiting…” on your screen. AirDrop is supposed to make wireless file transfer feel effortless, and most of the time it does. But when AirDrop is not working on Mac, it can feel like the whole Apple ecosystem has just let you down.
The good news? In most cases, the fix is surprisingly simple. You just need to know where to look. This guide walks you through every possible reason AirDrop might be failing on your Mac and gives you real, working solutions, not vague advice like “try restarting.”
What Makes AirDrop Such a Big Deal?
AirDrop is one of those features that quietly changed the way people use Apple devices. Before it existed, sending a photo from your iPhone to your MacBook meant emailing it to yourself, plugging in a cable, or fumbling with third-party apps. Now it is just a tap and a click.
It works using a combination of Bluetooth and Wi-Fi. Bluetooth handles the discovery of nearby Apple devices while Wi-Fi creates a peer-to-peer connection for the actual transfer. That is why both need to be active at the same time. If either one goes down, the whole thing falls apart.
AirDrop works across iPhone, iPad, Mac, and even iPod touch (5th generation or later). It has been around since OS X Yosemite and iOS 7, so most people with a relatively modern device should have access to it. The problem is not usually a lack of support, it is usually a small setting that is quietly turned off or conflicting with something else.
Why Is AirDrop Not Working on Your Mac?
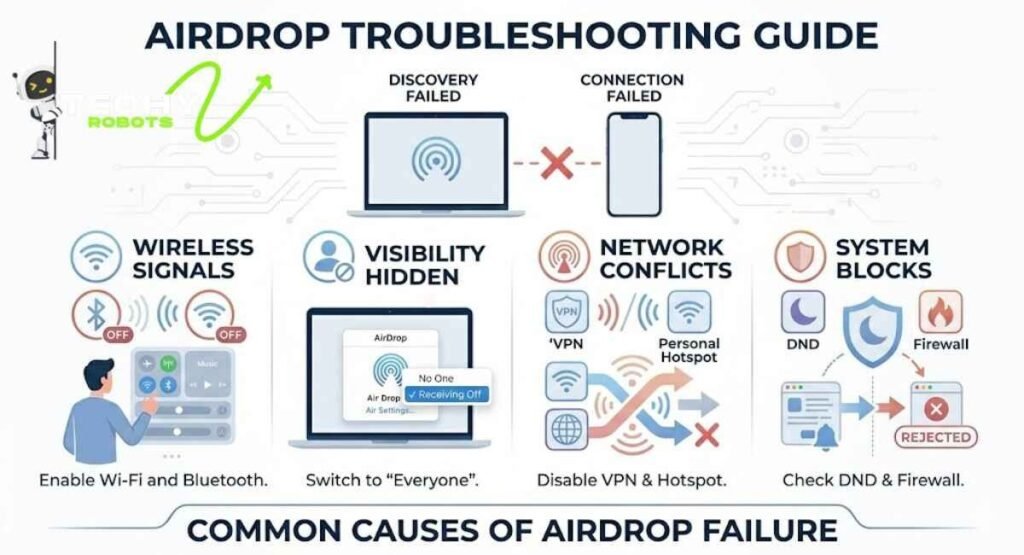
Before jumping into fixes, it helps to understand what is actually going wrong. AirDrop failures tend to fall into a few categories: discovery issues (your Mac cannot find the other device), connection issues (the devices see each other but the transfer fails), and setting conflicts (something in your system is blocking the transfer without you realizing it).
The Most Common Culprits Behind AirDrop Issues
Here is a quick look at what tends to cause AirDrop problems most often:
Bluetooth or Wi-Fi being turned off is the number one cause. Since AirDrop needs both, even having just one disabled breaks everything. Beyond that, your AirDrop receiving setting might be set to “Receiving Off,” meaning your Mac is essentially invisible to other devices. Personal Hotspot is another sneaky one when it is active on your iPhone, it can block AirDrop from working properly.
Do Not Disturb and Focus Mode on either device can also silently reject incoming AirDrop requests. And on Mac specifically, the firewall or a running VPN can block the peer-to-peer connection that AirDrop relies on.
Now let us go through each fix one by one.
Step 1: Check If Bluetooth and Wi-Fi Are Both On
This sounds almost too obvious, but you would be surprised how often this is the issue. AirDrop requires Bluetooth to discover nearby devices and Wi-Fi to carry out the actual transfer. If either is off, AirDrop simply will not work — no error message, no explanation, just silence.
How to Verify Your Wireless Settings on Mac
On your Mac, look at the menu bar in the top right corner. You should see a Bluetooth icon and a Wi-Fi icon. If either looks grayed out or has a slash through it, click on it and turn it on. You can also go to System Settings (or System Preferences on older macOS versions) and check both Bluetooth and Wi-Fi from there.
On your iPhone, swipe down from the top right corner to open the Control Center. Make sure both the Bluetooth and Wi-Fi tiles are highlighted in blue. If they are white or grayed out, tap them to enable them. Keep in mind that turning Wi-Fi off in the Control Center does not always fully disable it but it is worth toggling both off and on again just to make sure they are working properly.
Step 2: Make Sure AirDrop Is Set to the Right Discovery Mode
One of the most overlooked AirDrop settings is discoverability. Your Mac could have AirDrop receiving turned off entirely, which means other devices cannot even see it. This is a privacy feature, but it quietly breaks AirDrop for a lot of people.
Contacts Only vs. Everyone for 10 Minutes
On Mac, open Finder and click on AirDrop in the sidebar. At the bottom of the AirDrop window, you will see a dropdown that says “Allow me to be discovered by.” You have three options: No One, Contacts Only, and Everyone. If it is set to No One, nothing can find your Mac. Set it to “Everyone” if you are having trouble you can always switch it back to “Contacts Only” after the transfer is done.
On iPhone, go to Settings, then General, then AirDrop. Select “Everyone for 10 Minutes.” This gives your device full discoverability for a short window, which is usually enough to complete the transfer without leaving your device permanently open to strangers.
Step 3: Bring Your Devices Closer Together
AirDrop uses Bluetooth for its initial connection, and Bluetooth has a limited range typically around 30 feet or so under ideal conditions. Walls, interference from other devices, and even the orientation of your devices can shorten that range significantly.
If you are trying to send a file from across the room or from another floor, your devices might not be able to establish a solid connection. Move your iPhone and Mac within a few feet of each other and try again. It sounds simple, but physical proximity genuinely makes a difference, especially in environments with a lot of wireless activity.
Step 4: Turn Bluetooth Off and Back On
Sometimes Bluetooth gets into a weird state where it is technically “on” but not functioning properly. The easiest fix for this is a simple toggle: turn it off, wait about ten seconds, and turn it back on.
On Mac, click the Bluetooth icon in the menu bar and select “Turn Bluetooth Off.” Wait a moment, then turn it back on. On an iPhone, do the same from Control Center or from Settings. This forces Bluetooth to reset its connections and can often clear up AirDrop discovery issues instantly.
Step 5: Disable Do Not Disturb and Focus Mode
This one catches a lot of people off guard. When Do Not Disturb or any Focus Mode is active on your iPhone or Mac, it can block incoming AirDrop requests without showing you any notification. Your Mac might receive the transfer request but silently reject it in the background.
Why Focus Mode Quietly Kills AirDrop
Focus modes are designed to filter out interruptions, and Apple treats AirDrop requests as interruptions. So if you have Work Focus, Sleep Focus, or a custom Focus mode running on either device, turn it off before trying to AirDrop something.
On Mac, click the Control Center icon in the menu bar, then click Focus, and turn off any active modes. On the iPhone, swipe down to open the Control Center and tap the Focus tile to disable it. Once both devices are free of any Focus restrictions, try the transfer again.
Step 6: Turn Off Personal Hotspot
If your iPhone’s Personal Hotspot is turned on, AirDrop will not work from that device. This is a known limitation and it is one that Apple has never made particularly obvious to users.
How Personal Hotspot Interferes with AirDrop
When Personal Hotspot is active, your iPhone switches its Wi-Fi chip into a mode that broadcasts a hotspot signal rather than connecting to a local network. This conflicts with the peer-to-peer Wi-Fi connection that AirDrop relies on.
To fix this, go to Settings on your iPhone and tap Personal Hotspot. Toggle it off. Now try AirDrop again in many cases, this alone solves the problem immediately.
Step 7: Check Your Mac’s Firewall Settings
macOS has a built-in firewall, and depending on how it is configured, it can block incoming AirDrop connections. This is more common on work-managed Macs or devices where the firewall has been customized.
How to Allow AirDrop Through Your Firewall
Go to System Settings on your Mac, then click Privacy and Security, then Firewall. If the firewall is on, click “Firewall Options” and make sure “Block all incoming connections” is not checked. You can also look for AirDrop-related services in the list and make sure they are set to allow incoming connections. Turning off the firewall temporarily just for testing can help you confirm whether it is the cause of your AirDrop problem.
Step 8: Disable VPN While Using AirDrop
VPNs route your internet traffic through external servers, and this can interfere with the local peer-to-peer connection that AirDrop uses. Even though AirDrop is supposed to work on your local network, some VPN configurations disrupt it entirely.
If you are running a VPN app on your Mac whether it is a work VPN, ClearVPN, or any other service try disconnecting it and then attempting the AirDrop transfer. You can reconnect once the file has been sent. If AirDrop works after turning off the VPN, you know exactly where the conflict was coming from.
Step 9: Restart Both Devices
A restart clears out temporary files, resets wireless connections, and gives everything a fresh start. It is not the most exciting solution, but it genuinely works more often than people expect.
Shut down your Mac properly through the Apple menu. On your iPhone, hold the side button and a volume button until you see the slider, then slide to power off. Turn both devices back on and try AirDrop again. Many users have found that a single restart resolved an AirDrop issue that had been bugging them for days.
Step 10: Reset Network Settings
If nothing has worked so far, resetting your iPhone’s network settings is worth trying. This clears out all saved Wi-Fi passwords, Bluetooth pairings, VPN configurations, and other connectivity settings essentially wiping the network slate clean.
What Happens When You Reset Network Settings?
On your iPhone, go to Settings, then General, then Transfer or Reset iPhone, then Reset, and finally Reset Network Settings. You will need to reconnect to your Wi-Fi network afterward and re-pair any Bluetooth devices. But if there was a corrupted network configuration causing your AirDrop issues, this will fix it.
Note that there is no equivalent “Reset Network Settings” on Mac, but you can manually remove and re-add your Wi-Fi network, or delete Bluetooth preferences from the Library folder if needed.
Step 11: Check AirDrop Compatibility
Not every Apple device supports AirDrop, and if you are working with older hardware, compatibility might be the actual issue rather than a setting problem.
Which Devices Actually Support AirDrop?
For transferring between iPhone and Mac specifically, you need an iPhone 5 or later running iOS 7 or higher, and a Mac from 2012 or later running OS X Yosemite or above. MacBook Pro models from 2012 onward support AirDrop over Wi-Fi between Macs, but AirDrop between iPhone and Mac (via personal hotspot-free connection) requires the newer infrastructure introduced in Yosemite.
If you have a MacBook Pro from around 2011 or earlier, you may find that AirDrop does not support cross-device transfers with iPhones at all, only Mac-to-Mac. In that case, you would need to use an alternative method.
Step 12: Fix AirDrop from Finder on Mac
Sometimes the issue is specific to how AirDrop shows up in Finder on your Mac. If the AirDrop window is not loading properly or seems stuck, there is a quick way to refresh it.
Using Command + Shift + R to Refresh Finder
Open Finder and navigate to the AirDrop section. Then press Command + Shift + R on your keyboard. This forces Finder to refresh its AirDrop view and can fix issues where nearby devices are not showing up. You can also try right-clicking in the AirDrop window and selecting “Look for an old Mac” if you are trying to connect to an older Apple computer.
AirDrop Over Cellular, What You Need to Know

Starting with iOS 17, Apple introduced the ability to use AirDrop over cellular data. This means that even if you move out of Bluetooth and Wi-Fi range during a transfer, it can continue over mobile data rather than failing mid-way through.
To enable this, go to Settings on your iPhone, tap General, then AirDrop, and toggle on “Use Mobile Data.” Keep in mind this uses your data allowance, so it is worth being mindful of file size. This feature is particularly useful for large transfers or when you step away from your device unexpectedly.
What to Do When AirDrop Transfer Keeps Failing
If AirDrop finds the device but the transfer itself keeps failing or getting stuck, the problem is usually with the file or the connection stability rather than the discovery settings.
AirDrop Slow Transfer Fixes
Slow AirDrop speeds are often tied to Wi-Fi signal quality. Even though AirDrop creates a peer-to-peer connection, the quality of your surrounding Wi-Fi environment still matters. You can use a tool like NetSpot on your Mac to check for Wi-Fi congestion and interference.
Try moving both devices away from microwaves, cordless phones, and other devices that broadcast on the 2.4GHz band. Switching your router to 5GHz if both devices support it can also dramatically speed up AirDrop transfers. For very large files, you might find it faster to use iCloud Drive or a USB cable while you troubleshoot the AirDrop connection.
AirDrop Alternatives Worth Trying
If you have tried everything and AirDrop is still giving you grief, there are solid alternatives that can fill the gap.
iCloud Drive lets you upload from your iPhone and download on your Mac seamlessly as long as you are signed into the same Apple ID. Google Drive and Dropbox work across platforms and devices without any Bluetooth or Wi-Fi pairing required.
For frequent large transfers, Dropshare is a popular Mac app that makes cloud-based sharing much faster. And of course, a Lightning or USB-C cable connected to your Mac gives you a direct, no-fuss transfer option that bypasses wireless entirely.
Conclusion
AirDrop not working on Mac is genuinely annoying, but almost every case comes down to something fixable: a setting that got toggled off, a feature running in the background, or two devices that just need a restart to rediscover each other. The key is to go through these fixes methodically rather than randomly poking at settings hoping something sticks.
Start with the basics: check Bluetooth and Wi-Fi, check your AirDrop discoverability setting, and turn off Personal Hotspot and Focus Mode. Those four things alone solve the majority of AirDrop issues. If those do not do it, work through the firewall, VPN, and network settings steps. And if all else fails, iCloud Drive and a USB cable are always there to get the job done while you figure out the rest.
The Apple ecosystem is genuinely great at making devices talk to each other. AirDrop just occasionally needs a little nudge to remember that.
FAQs
1. Why does AirDrop say “Waiting” and never complete the transfer?
This usually happens because Bluetooth or Wi-Fi dropped during the transfer, the receiving device moved out of range, or the receiving device had Do Not Disturb or Focus Mode active that silently rejected the request. Try toggling Bluetooth off and on, bring the devices closer, and make sure Focus Mode is turned off on both ends.
2. Why can’t my Mac find my iPhone in AirDrop?
The most likely reason is that your iPhone’s AirDrop discoverability is set to “Receiving Off” or “Contacts Only” and your Apple ID is not in your own contacts. Go to Settings, then General, then AirDrop on your iPhone and change it to “Everyone for 10 Minutes.” Also make sure Personal Hotspot is turned off.
3. Does AirDrop work with non-Apple devices?
No, AirDrop is exclusive to the Apple ecosystem. It only works between iPhones, iPads, Macs, and iPod touches. If you need to transfer files to a Windows PC or Android device, use Google Drive, Dropbox, or a USB cable instead.
4. Why does AirDrop work sometimes but not other times?
Inconsistent AirDrop behavior is often caused by interference from other wireless devices, Bluetooth range limitations, or background processes like VPNs and Focus modes that activate without you noticing. Keeping your devices updated to the latest version of macOS and iOS also helps, as Apple regularly patches AirDrop bugs.
5. Can AirDrop transfer large video files?
Yes, AirDrop has no official file size limit and handles large video files well under good conditions. If transfers are slow or failing on large files, make sure both devices are close together, Wi-Fi signal is strong, and you have enough storage space on the receiving device. Using iOS 17’s AirDrop over cellular feature can also help complete large transfers if you step out of range.